Use this guide to understand what each button and control does, where it takes you, and how to move through the Nanaska Edge Awards demo.
Step 1
Start with your dashboard
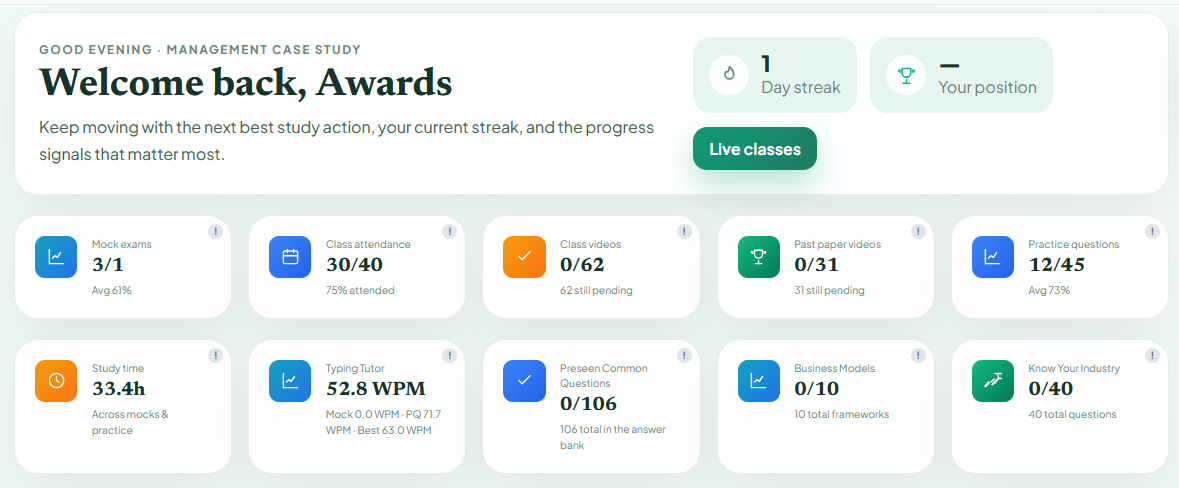
The dashboard is the student’s progress centre. It brings the most important learning signals into one view, so students can quickly see what they have completed, what remains, and where to continue next.
The student dashboard summarises progress and highlights the next study priorities.
Welcome and recommended next action
The welcome panel identifies the current student and keeps attention on the next best study action. Use it as the starting point whenever you return to the platform instead of searching through each learning area individually.
Day streak
Shows how many consecutive days the student has remained active. A growing streak encourages a consistent study habit and makes regular, shorter practice sessions visible.
Your position
Shows the student’s current position when ranking information is available. A dash means that a position has not yet been calculated or there is not enough activity to display one.
Live classes
Select Live classes to move directly to the live-learning area and check the classes available to join. This is the quickest route from the dashboard to a scheduled teaching session.
Mock exams
Summarises mock-exam activity and the student’s average result. The main ratio records completed activity against the assigned or available target, while the percentage underneath shows performance across attempts.
Class attendance
Displays attended classes out of the total recorded classes. The percentage underneath converts that ratio into an attendance rate—for example, 30 of 40 classes is 75% attendance.
Class videos
Tracks watched class recordings against the full video library. The pending message states exactly how many videos remain, making unfinished lesson content easy to identify.
Past-paper videos
Tracks completed walkthroughs of past-paper questions. These videos help students understand how exam answers are approached, structured, and evaluated.
Practice questions
Shows answered questions out of the available practice set. The average percentage reflects the student’s performance, so progress and answer quality can be reviewed together.
Study time
Adds up time spent on tracked mock exams and question practice. Use this figure as a broad measure of engagement, then compare it with results to judge whether study time is effective.
Typing Tutor
Reports typing speed in words per minute (WPM), with separate detail for mock exams and practice questions where available. The best score helps the student monitor improvement in fast, accurate written responses.
Pre-seen common questions
Tracks completed questions from the pre-seen answer bank. The total shows the size of the available bank and the first number shows how many the student has worked through.
Business Models
Shows progress through the business-model frameworks provided for the case study. Students can use this area to strengthen the structure and terminology used in their answers.
Know Your Industry
Tracks industry-focused questions designed to build commercial awareness around the case. Completing these questions helps connect technical knowledge with the organisation’s real business environment.
Step 2
Review the weekly calendar
The weekly calendar turns the student’s timetable and study requirements into one practical plan. It can include upcoming classes, regular learning activities, one-off or ad hoc work, and useful follow-up tasks suggested by the AI.
The weekly plan groups activities by status and provides direct access to the full planner.
This week’s tasks
This summary helps the student decide what needs attention now. Each task is automatically grouped by its current status, and the number on each column shows how many items it contains. This makes it possible to assess the whole week without opening every activity separately.
Completed activities
Lists work finished during the current week. Completed items move here so students can confirm what they have achieved and avoid repeating work unnecessarily. An empty column simply means that nothing has been marked complete yet.
Pending activities
Shows tasks that still need to be completed. These may be scheduled course activities, practice questions, ad hoc work added for the student, or a relevant next step recommended by the AI.
Missed activities
Highlights tasks or live classes whose scheduled time has passed without completion or attendance being recorded. Students should review this column first and catch up where the activity is still available.
Task information
Each row identifies the activity and shows useful context on the right, such as the activity type, requirement, day, or class time. Select a task to open its details and continue with the work.
Open planner
Opens the full planning view for a broader look at scheduled work. Use it when you need to review activities beyond the compact weekly summary or understand how study items fit together.
View tasks
Use this control to change or expand the task view. It provides a quick way to inspect the activities represented in the weekly summary without losing your place on the dashboard.
Step 3
Read the pre-seen document
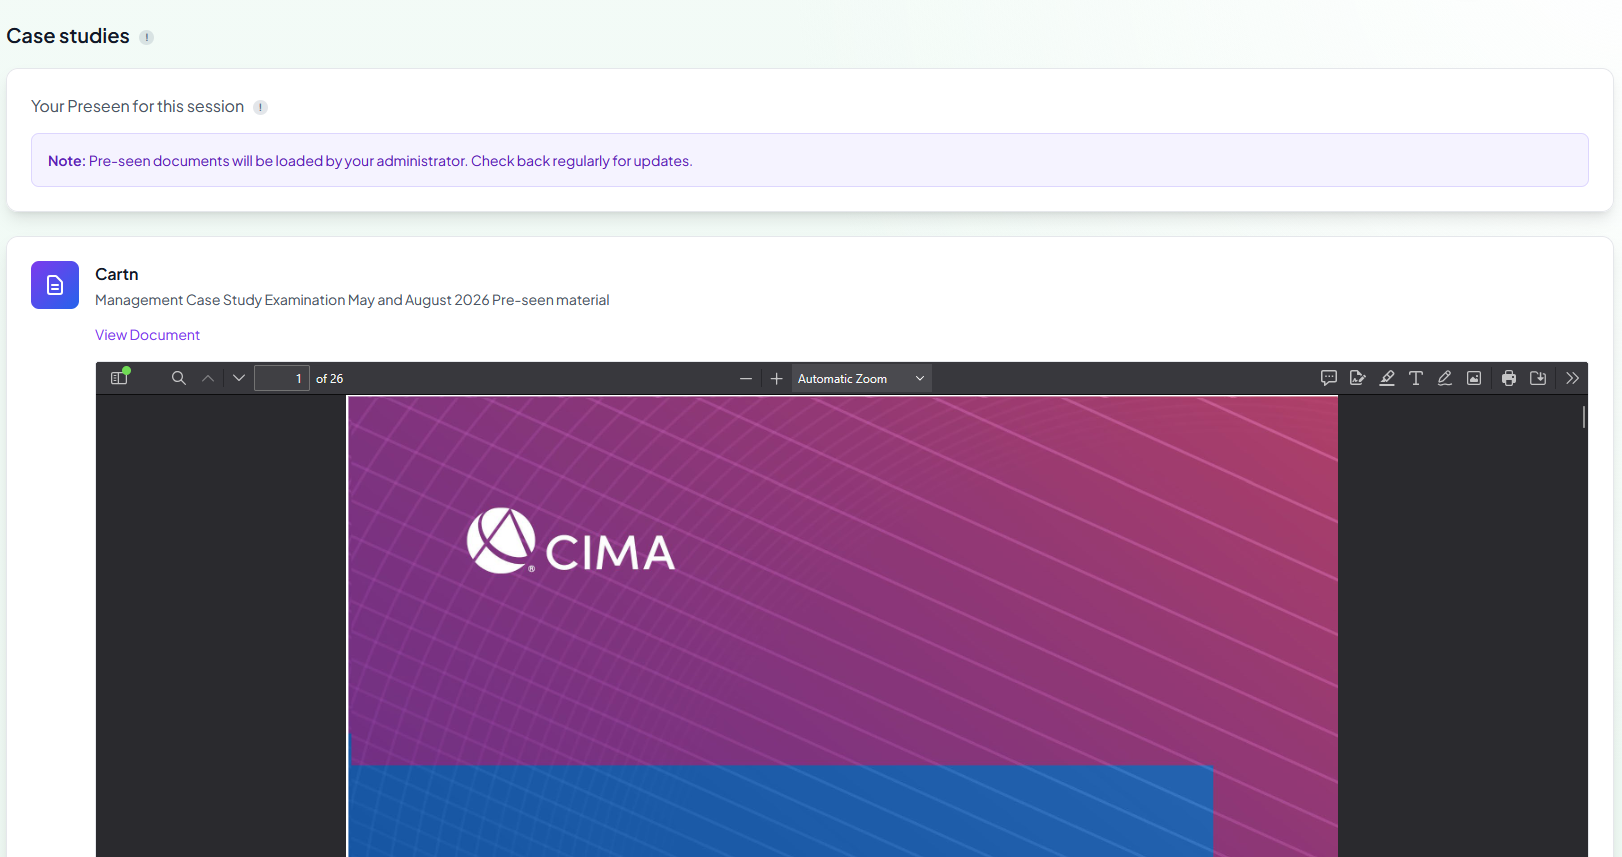
The Case Studies area gives students direct access to the official pre-seen material for their examination session. Reading it inside the platform keeps the source material close to the related classes, questions, and case-study activities.
The assigned pre-seen can be read directly inside the Case Studies area.
Your pre-seen for this session
This area displays the document assigned to the student’s current examination session. Before beginning detailed study, check the document title and session description to make sure you are reading the correct pre-seen material.
Administrator updates
Pre-seen documents are published by the course administrator. If no document appears, or an update is expected, return to this page regularly. The notice at the top will explain when availability depends on an administrator upload.
Document title and description
The document card identifies the case and describes the relevant examination sitting—for example, the May and August 2026 Management Case Study session. Use these details to verify the material before reading.
View Document
Select View Document to open or focus the pre-seen reader. The PDF is displayed within the page, allowing students to study it without moving away from the learning platform.
Move through the pages
The page indicator shows the current page and the document’s total length, such as page 1 of 26. Use the previous and next controls, enter a page number, or scroll through the reader to move around the document.
Zoom and search
Adjust the zoom level to make detailed text or diagrams easier to read. The viewer’s search control can be used to locate names, themes, figures, or industry terms quickly within the pre-seen.
Reader tools
The toolbar may also provide options such as annotations, printing, or downloading, depending on the browser and the permissions enabled for the document. These controls can support offline review and personal study notes when available.
Step 4
Ask questions about the pre-seen
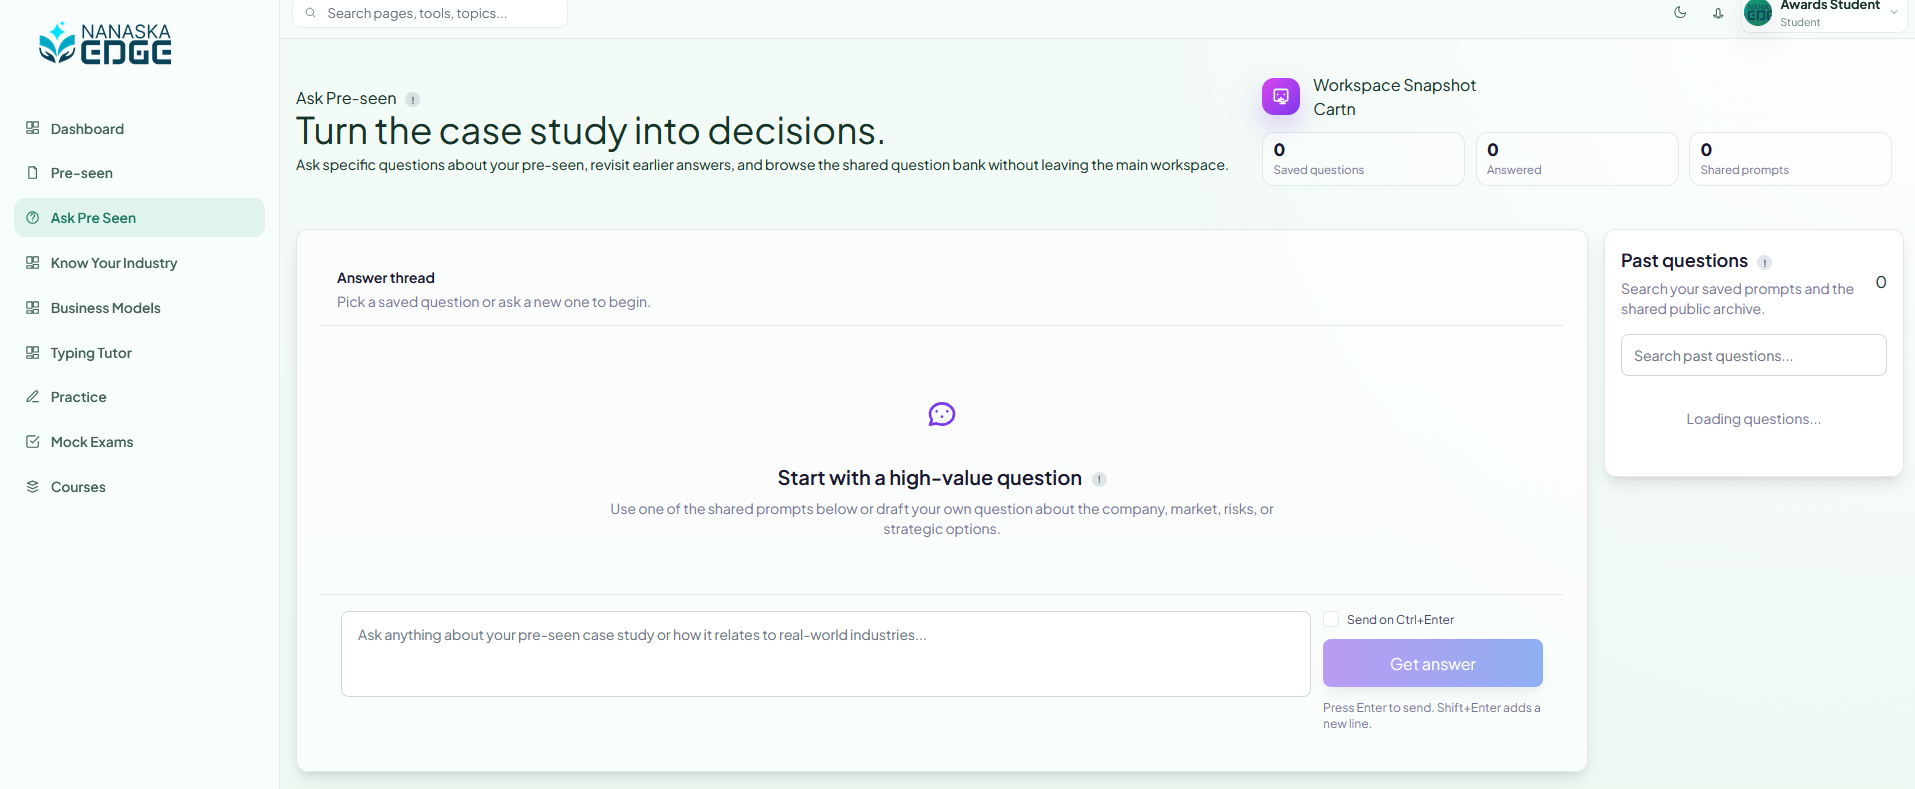
Ask Pre-seen is an AI-assisted study workspace for clarifying the case material. Students can ask focused questions about the organisation, market, risks, stakeholders, figures, or strategic options and use the responses to deepen their understanding before attempting related activities.
Ask a focused question, review the answer thread, and revisit earlier questions.
Turn the case study into decisions
Use this workspace after reading the pre-seen to move from simply identifying facts to understanding what those facts could mean for management decisions. Strong questions connect case evidence to likely consequences, risks, opportunities, and practical actions.
Ask a focused question
Enter a clear question in the box at the bottom of the answer thread, then select Get answer. Include the part of the case you want clarified and the type of insight you need; specific questions normally produce more useful explanations than broad requests for a summary.
Use the answer thread
The response appears in the central thread. Review the explanation, then ask a follow-up question to examine an assumption, request an example, compare options, or connect the answer with another fact in the pre-seen.
Start from shared prompts
Shared prompts provide useful, ready-made questions selected for the case. They are helpful when a student is unsure where to begin and can reveal important areas such as the company, market, risks, or strategic choices.
Revisit past questions
The Past questions panel contains saved questions and shared public prompts. Use its search box to find an earlier topic, reopen the relevant question, and continue learning without having to recreate the original prompt.
Workspace snapshot
The counters summarise how the workspace is being used: Saved questions records retained prompts, Answered shows questions with responses, and Shared prompts shows prompts available from the shared question bank.
Keyboard controls
Select the sending preference shown beside the question box if you want to submit with Ctrl+Enter. Follow the on-screen hint for line breaks and submission so longer, structured questions can be written without being sent accidentally.
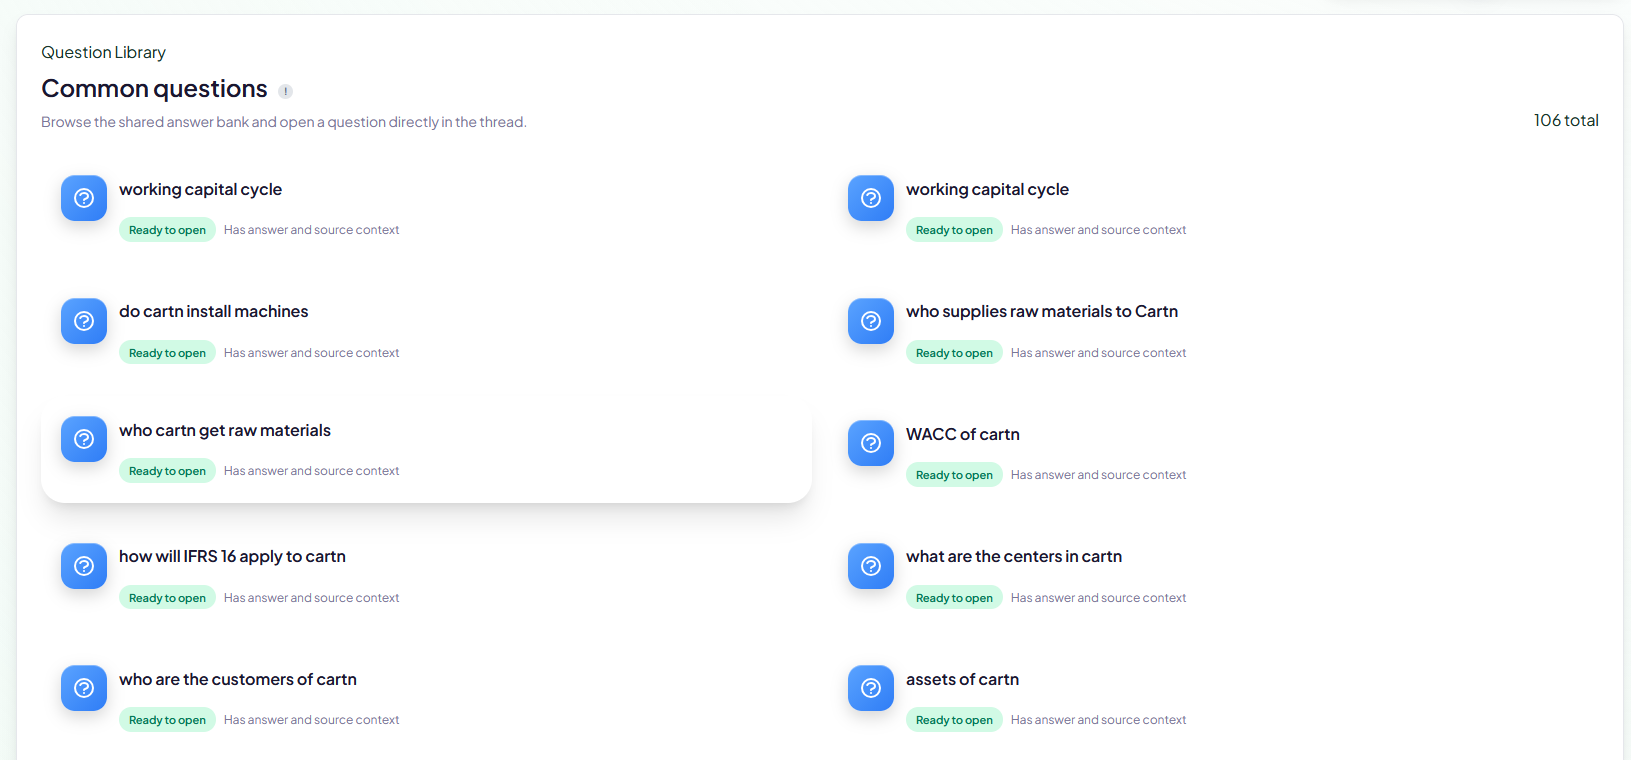
The shared question library lets students open prepared answers and their source context.
Explore the Common questions library
The Question Library is a shared FAQ-style answer bank for the current pre-seen. It gives students quick access to useful questions that have already been prepared, covering case facts and technical topics such as suppliers, customers, assets, working capital, WACC, and the application of relevant accounting standards.
Open a question
Select any question card to open it directly in the Ask Pre-seen answer thread. The student can read the prepared response and then ask a more specific follow-up question if further clarification is needed.
Check question availability
Ready to open confirms that the question has a prepared response. The accompanying Has answer and source context label indicates that supporting case context is available with the answer.
Use the library total
The total in the upper-right corner shows the number of common questions available—for example, 106 questions. This also corresponds with the Common Questions progress indicator on the student dashboard.
Build understanding by topic
Work through related questions together instead of reading them at random. Grouping questions around operations, finance, stakeholders, industry conditions, and strategy makes it easier to form a connected understanding of the case.
Step 5
Research the real industry
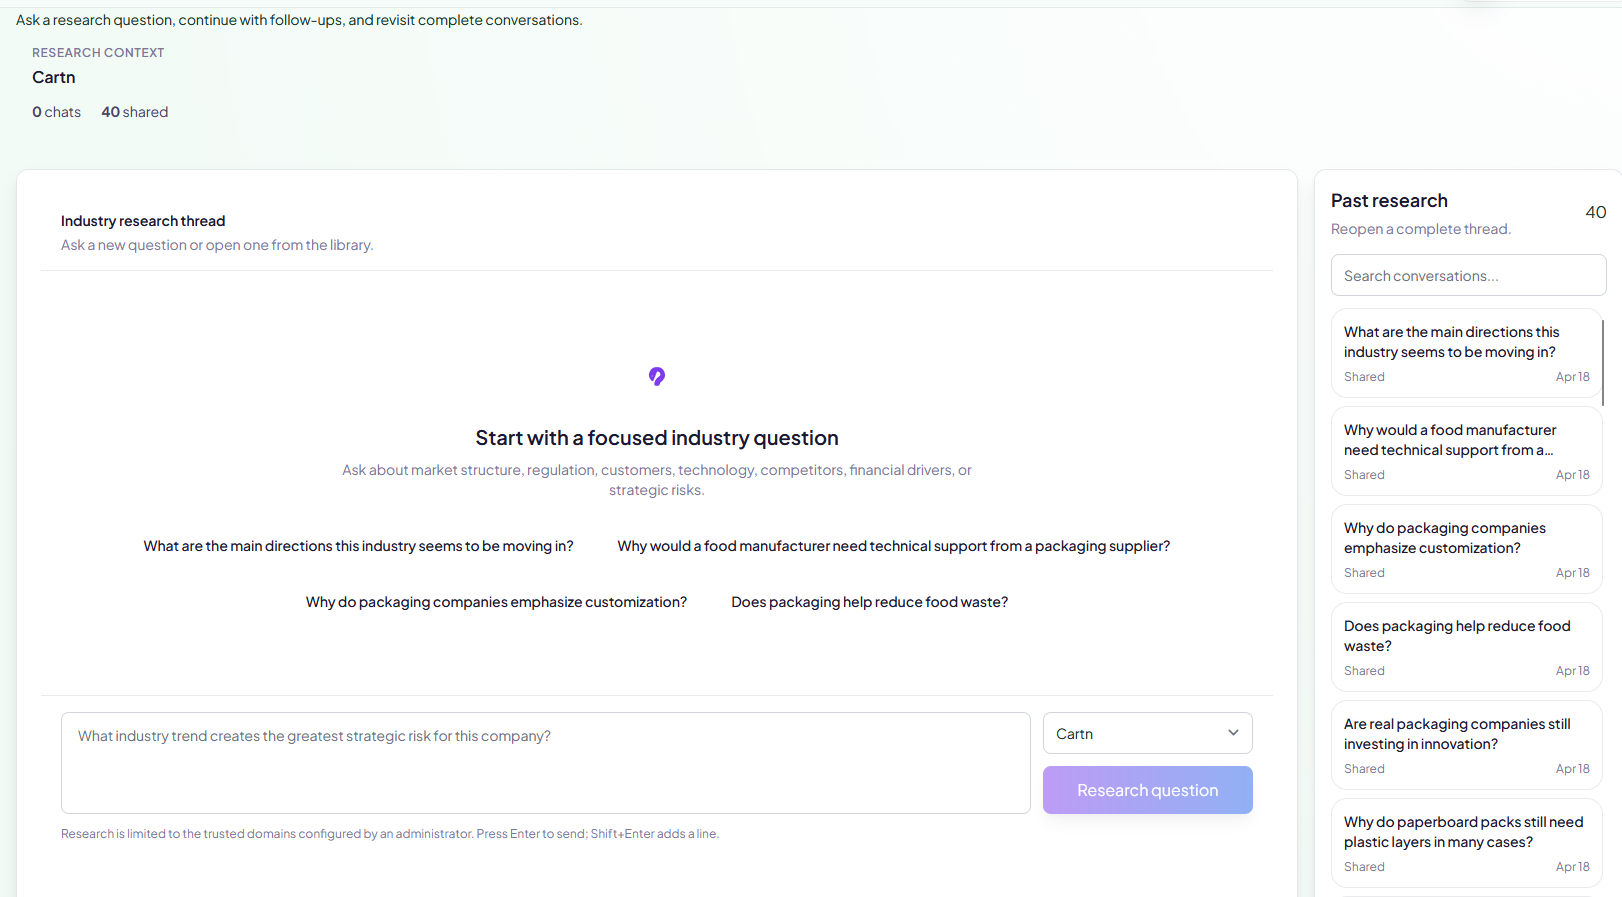
Ask Industry extends learning beyond the facts contained in the pre-seen. It connects to the internet through research-publication APIs and administrator-approved reputable sources—including services such as Google Scholar and Bloomberg—to investigate the real industry associated with the selected case.
Ask focused industry questions and reopen completed research conversations.
Connect the case with current industry evidence
The workspace helps students develop a more grounded and realistic view of the challenges and opportunities the industry actually faces. Use it to examine market structure, regulation, customers, technology, competitors, financial drivers, innovation, and strategic risks that may affect the pre-seen organisation.
Confirm the research context
The Research Context identifies the organisation or case currently guiding the research. Check this before starting so the question is connected with the correct pre-seen and industry.
Ask a focused research question
Type a specific question in the research box, confirm the selected context, and choose Research question. A focused question—about one trend, risk, customer need, regulation, or technology—will usually be more useful than a request to explain the entire industry.
Begin with a suggested question
Select one of the suggested questions in the research thread when you need a starting point. These prompts demonstrate useful lines of enquiry, such as industry direction, customer support, customisation, sustainability, or innovation.
Continue with follow-ups
Use follow-up questions to test the first response, clarify unfamiliar terms, examine contrary evidence, compare organisations, or ask how an industry finding could affect the case-study company.
Reopen past research
The Past research panel lists completed and shared conversations. Search the list or select a previous question to reopen its full thread, review the evidence, and continue the investigation without starting again.
Understand chats and shared research
The counters near the research context show the student’s research conversations and the number of shared threads available. Shared research can expose students to useful questions and findings contributed to the common research library.
Use trusted-source boundaries
Internet research is restricted to trusted domains and data sources configured by an administrator. Students should still check publication dates, distinguish evidence from interpretation, and compare important claims with the cited source before applying them.
Step 6
Apply business-modelling frameworks
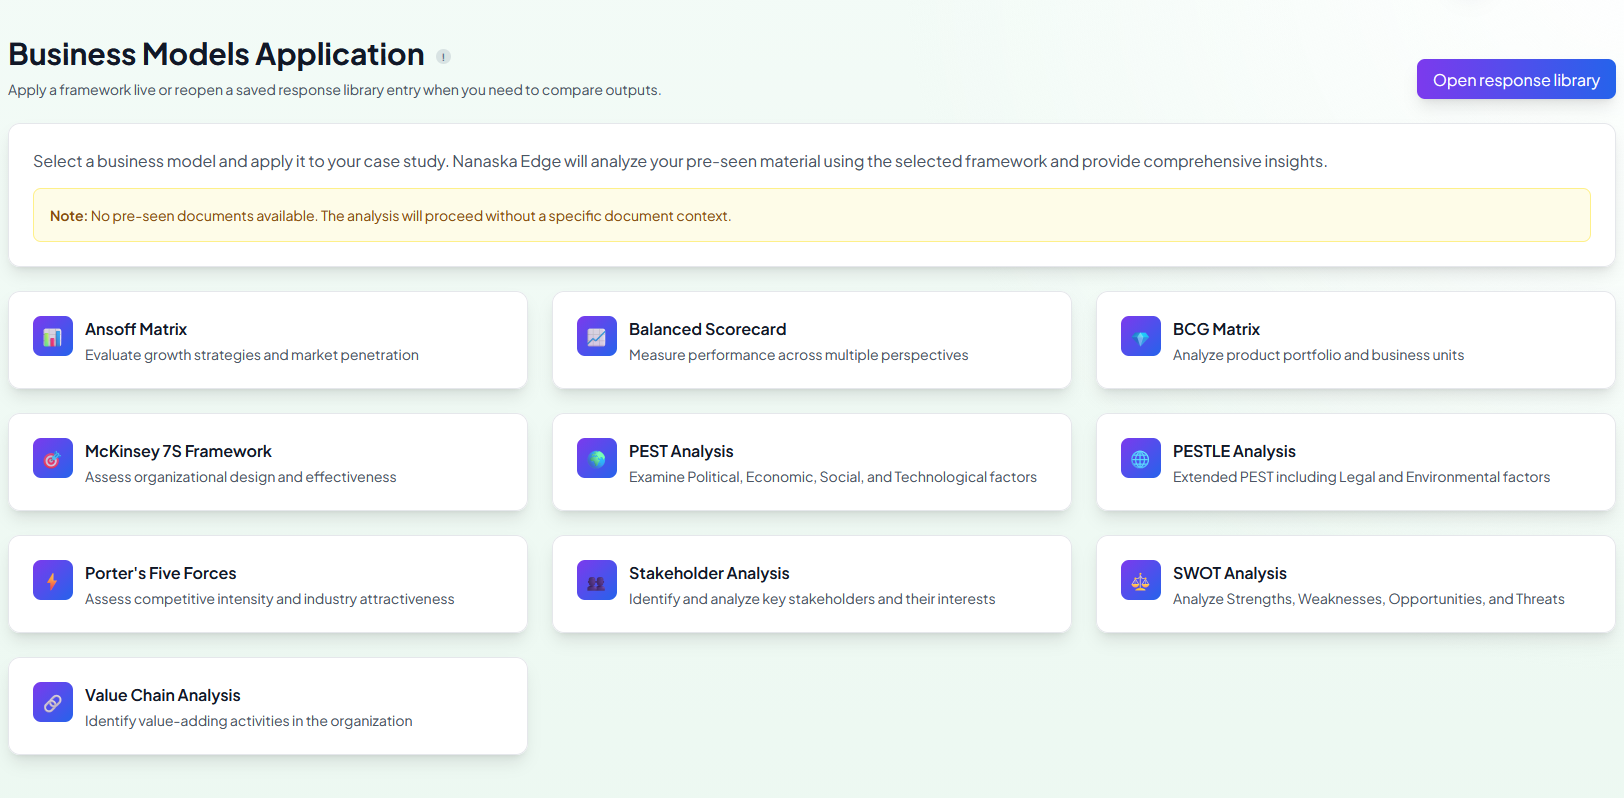
Business Models Application allows the AI to apply ten recognised business frameworks directly to the case material. Each result combines a visual representation with a detailed written explanation, helping students see how a model represents the organisation instead of merely memorising its theory.
Select one of ten recognised frameworks and apply it to the case material.
Apply a framework to the case
Select a framework card to begin. Nanaska Edge analyses the available pre-seen material through that model and generates case-specific insights. Read the visual and written sections together: the visual reveals the structure of the model, while the explanation connects each part with evidence and implications for the organisation.
Ansoff Matrix
Evaluates growth choices through market penetration, market development, product development, and diversification. Use it to compare growth direction with the organisation’s capabilities and risk appetite.
Balanced Scorecard
Examines performance through financial, customer, internal-process, and learning-and-growth perspectives, showing how objectives and measures should support one another.
BCG Matrix
Reviews products or business units by market growth and relative market share. It helps students discuss portfolio priorities and the allocation of resources.
McKinsey 7S Framework
Assesses alignment across strategy, structure, systems, shared values, skills, style, and staff to identify organisational strengths, gaps, and implementation challenges.
PEST Analysis
Explores political, economic, social, and technological forces in the external environment and considers how they could influence the organisation’s choices.
PESTLE Analysis
Extends PEST by adding legal and environmental factors. Use it when regulation, compliance, sustainability, or ecological pressures materially affect the case.
Porter’s Five Forces
Assesses rivalry, new entrants, substitutes, supplier power, and buyer power to explain competitive intensity and the attractiveness of the industry.
Stakeholder Analysis
Identifies important stakeholders, their interests, influence, and likely concerns. This supports prioritisation, communication planning, and evaluation of competing needs.
SWOT Analysis
Separates internal strengths and weaknesses from external opportunities and threats, then helps students consider actions that connect the four areas.
Value Chain Analysis
Examines the organisation’s primary and supporting activities to identify where value is created, costs arise, and improvements or competitive advantages may be developed.
Open the response library
Select Open response library to revisit saved framework applications. This makes it easier to compare earlier outputs, review different models, and return to useful analysis while preparing an answer.
Check the document context
If the page reports that no pre-seen document is available, the framework can still run but its analysis will not use the specific case document. For case-focused work, return after the administrator has uploaded the correct pre-seen.
Step 7
Review Typing Tutor performance
Typing Tutor uses paragraph-based exercises to help students develop the speed and accuracy needed for computer-based assessment. Its statistics page records recent attempts and summarises longer-term performance, making improvement easy to monitor.
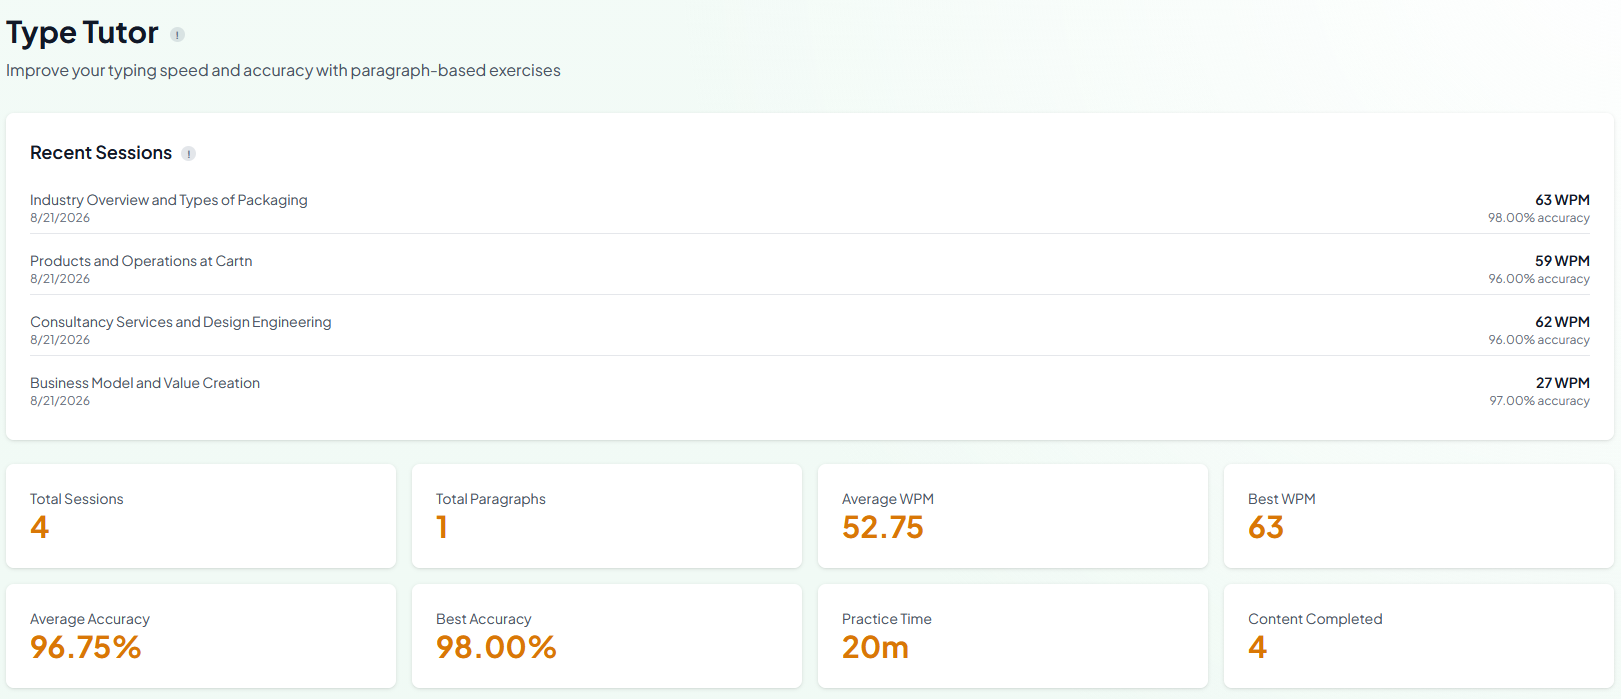
Recent sessions and summary statistics reveal typing speed, accuracy, and consistency.
Recent Sessions
This history lists the paragraph or topic practised, the session date, typing speed, and accuracy. Compare recent rows to see whether performance is becoming faster and more consistent across different types of case-related content.
Words per minute (WPM)
WPM measures typing speed. A higher result means more words were entered within the available time, but speed should be considered alongside accuracy rather than treated as the only target.
Accuracy
Accuracy shows the percentage of the exercise typed correctly. A fast attempt with many errors may be less useful in an assessment than a slightly slower response that is clear and reliable.
Total Sessions and Total Paragraphs
Total Sessions counts recorded practice attempts. Total Paragraphs records the paragraph material represented by those attempts, allowing students to distinguish repeated practice from coverage of additional material.
Average and Best WPM
Average WPM reflects speed across the recorded sessions and is the better indicator of consistent performance. Best WPM shows the fastest individual result achieved so far.
Average and Best Accuracy
Average Accuracy shows overall correctness across practice, while Best Accuracy records the strongest individual result. Use both values to check whether improved speed is being achieved without increasing errors.
Practice Time
Shows the total time recorded in Typing Tutor exercises. Regular short sessions usually give a clearer picture of sustainable improvement than one unusually long practice attempt.
Content Completed
Counts the typing content completed by the student. Completing varied, case-related material helps practise both keyboard fluency and familiarity with the language used in study and assessment.
Use the dashboard summary
The headline Typing Tutor result also appears on the main dashboard. Open this detailed statistics page whenever you need to understand which sessions produced that overall result.
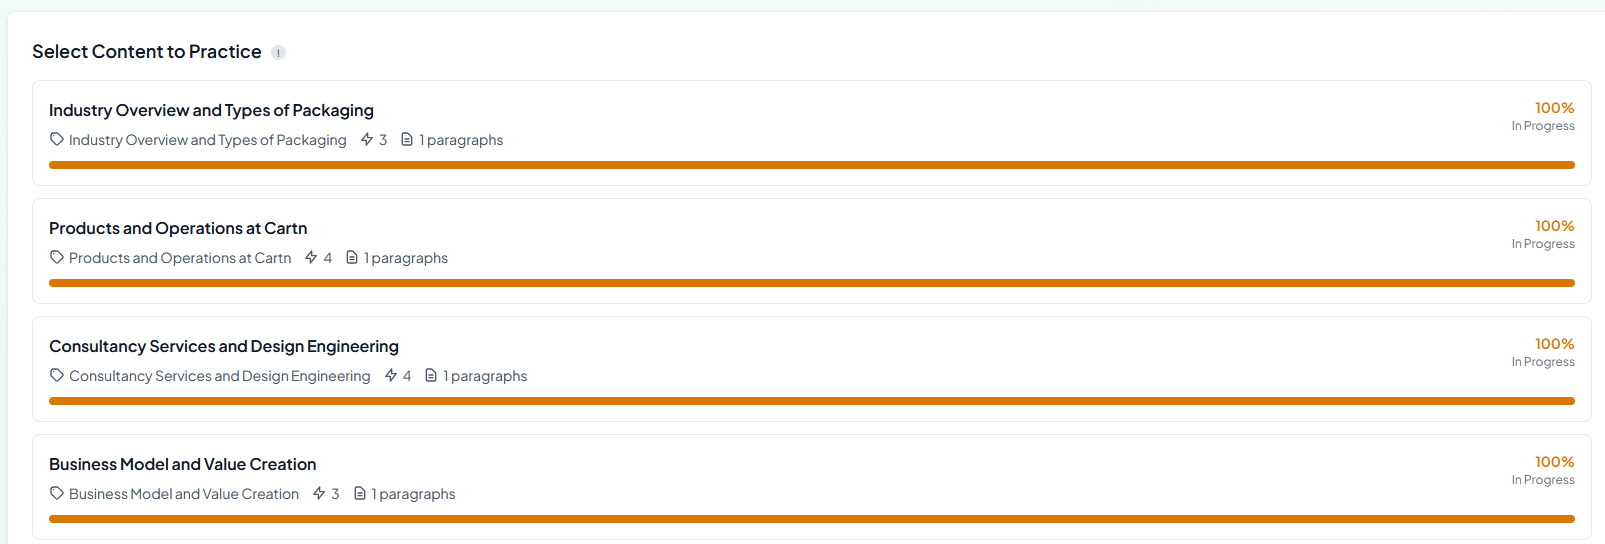
Select case-related material and review its exercise details and progress.
Select Content to Practice
This list contains paragraph exercises drawn from case and industry material. Select a content card to open its typing exercise. Using relevant material lets students practise keyboard skills while becoming more familiar with the organisation, its operations, and important business terminology.
Choose a topic
Each card is labelled with its subject, such as the industry overview, products and operations, consultancy services, or business models and value creation. Choose a weaker or less familiar area when targeted practice would be useful.
Check the exercise details
The metadata beneath the title identifies the content category and shows information about the available exercise, including its paragraph count. Review it before opening the material so you know what the session contains.
Read the progress bar
The percentage and coloured bar show recorded progress for that content. They help students identify material they have already attempted and topics that still need attention.
Continue in-progress material
The status shown on the right indicates whether the content is currently in progress. Reopen that card to continue or repeat the exercise, then check the updated speed and accuracy in Recent Sessions.
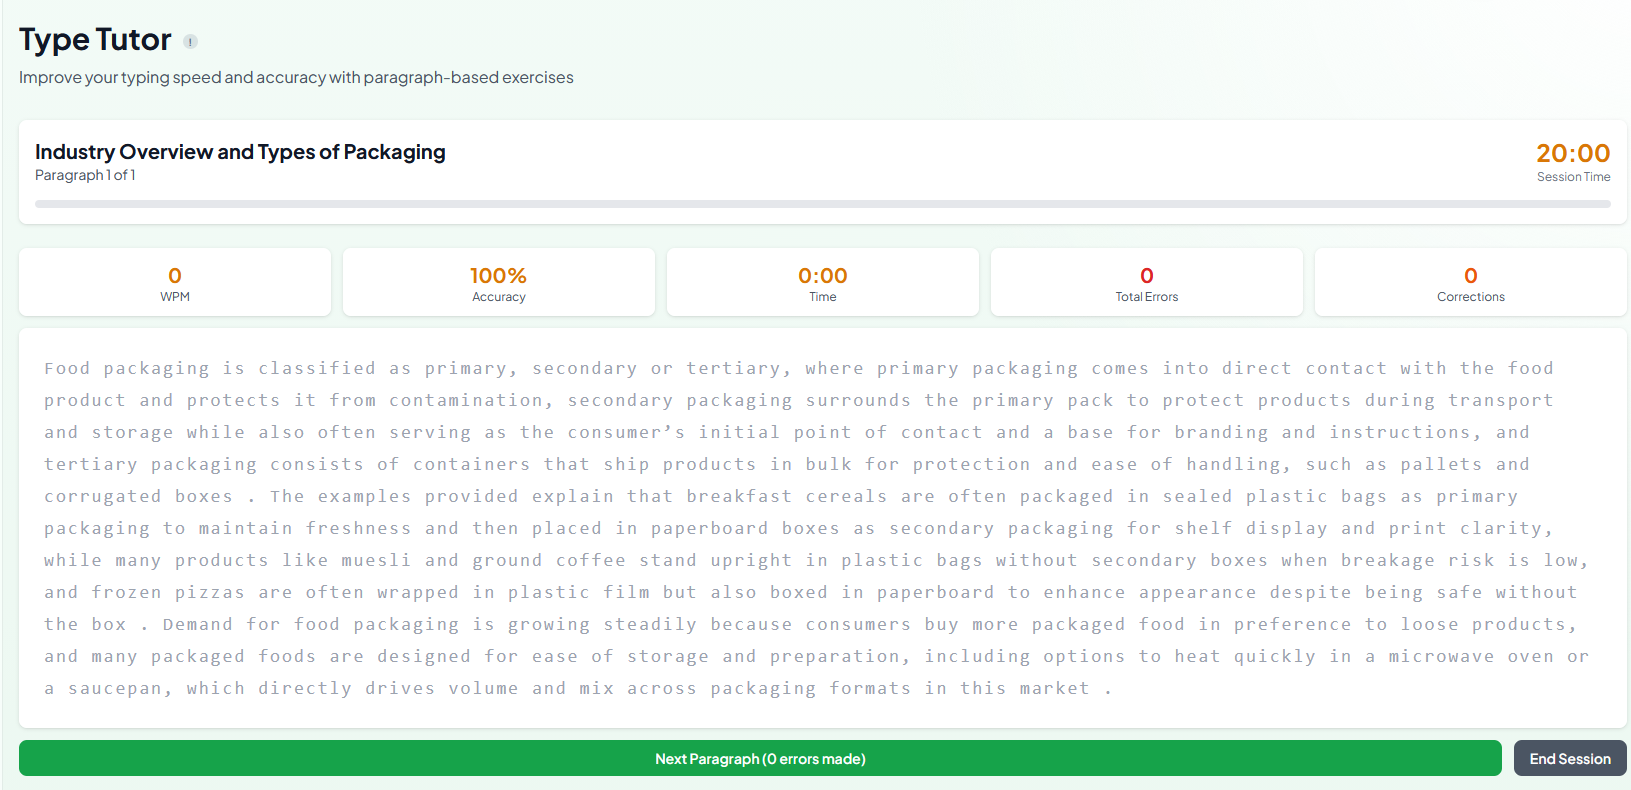
The live exercise measures speed and correctness while the student types the displayed paragraph.
Complete the typing exercise
The exercise displays a case-related paragraph for the student to reproduce. Type the displayed text in order, paying attention to spelling, punctuation, capitalisation, and spacing. Performance indicators update during the session so speed and correctness can be monitored immediately.
Topic and paragraph progress
The heading confirms the selected content, while the paragraph indicator shows the current paragraph and total number available. The progress bar fills as the exercise advances.
Session Time and elapsed Time
Session Time shows the available exercise duration. The separate Time statistic records how long the current attempt has been running, helping students practise working at a controlled assessment pace.
Live WPM and Accuracy
WPM measures current typing speed and Accuracy measures how closely the entry matches the paragraph. These begin at their default values and update after typing starts.
Total Errors and Corrections
Total Errors records incorrect entries detected during the attempt. Corrections shows mistakes that the student has gone back and fixed, making it possible to distinguish first-pass accuracy from corrected work.
Next Paragraph
After completing the displayed text, use Next Paragraph to continue. The button also reports the errors made, so review and correct the entry where possible before moving forward.
End Session
Select End Session when the practice attempt is finished or needs to be stopped. The completed attempt can then be reviewed in Recent Sessions and included in the overall Typing Tutor statistics.
Step 8
Complete Practice Questions
Practice Questions provide timed, case-related activities with instant Nanaska Edge marking and detailed feedback. Students can monitor completed sets, practise forming assessment-ready answers, and use each result to improve the next attempt.
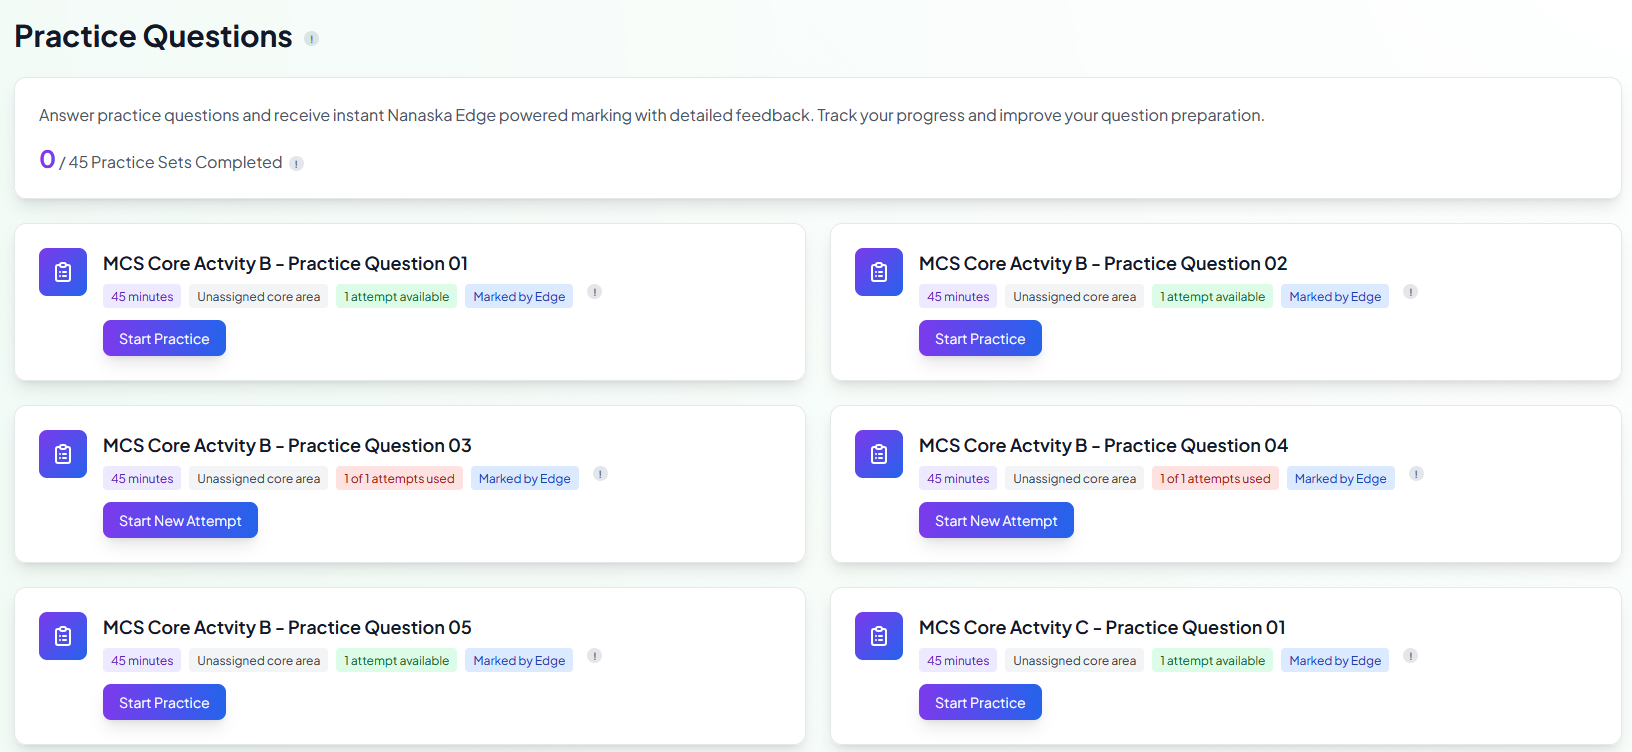
Select a timed practice set, review attempt availability, and receive Nanaska Edge marking.
Choose a practice set
The page lists the practice questions available for each core activity. Review the title and labels on a card before starting so you understand the question group, available time, marking method, and remaining attempts.
Track completed sets
The progress summary shows completed practice sets against the full number available—for example, 0 of 45. This figure also contributes to the Practice Questions indicator on the main dashboard.
Check the time allowance
Each card displays the time allowed for that activity, such as 45 minutes. Use the limit to practise planning, writing, and reviewing an answer at a realistic assessment pace.
Review the core area
The core-area label identifies the competency or syllabus area associated with the question when one has been assigned. An unassigned label means that no specific core area is currently attached.
Understand attempt availability
A green availability label shows that an attempt remains. If an attempt has already been used, the card reports the number used and offers Start New Attempt when another submission is permitted.
Start or retry a question
Select Start Practice for a new activity. Select Start New Attempt to retry a previously attempted question, applying the lessons from earlier feedback.
Marked by Edge
This label indicates that Nanaska Edge will evaluate the submitted response and provide feedback. Review both the result and the detailed comments to identify what was done well and what should be improved.
Step 9
Take a Mock Examination
Mock Examinations simulate a full assessment using timed, system-generated questions. Students complete the paper under realistic conditions and receive Nanaska Edge AI marking and feedback to identify strengths, knowledge gaps, and areas requiring further practice.
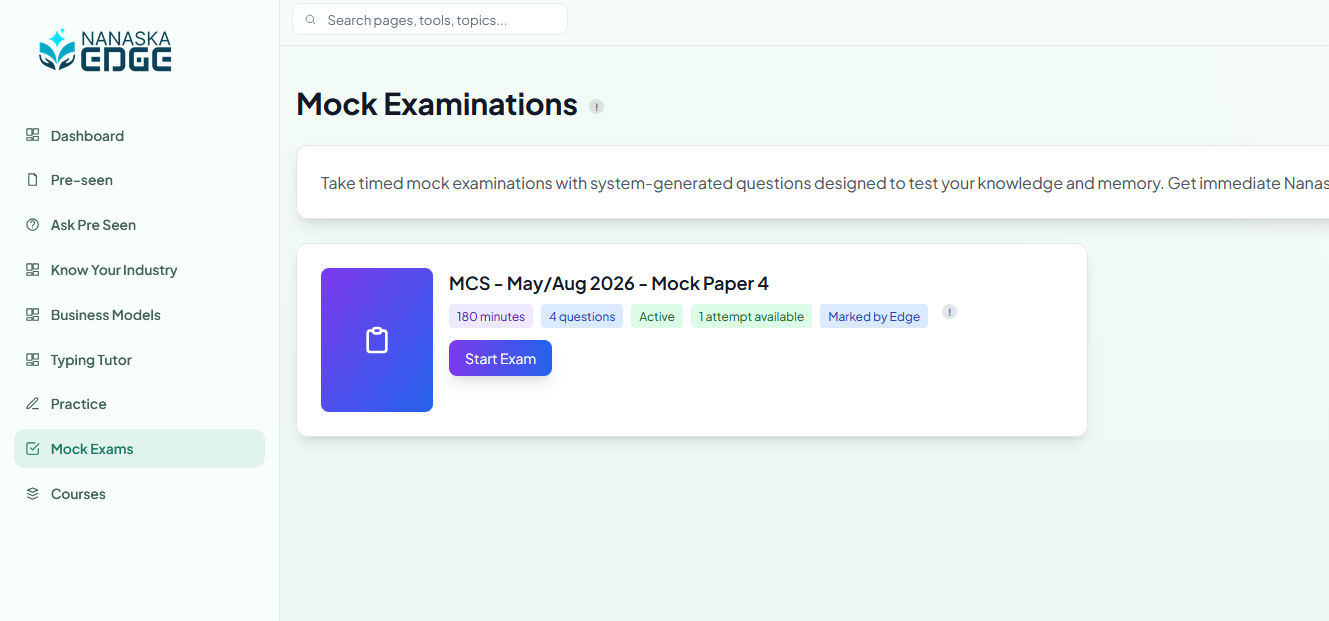
Check the paper details and attempt availability before starting the timed mock examination.
Select the correct mock paper
The paper card identifies the case-study level, examination session, and mock-paper number. Confirm that these details match the material you are studying before beginning the attempt.
Review the exam duration
The time label shows the full duration of the mock—for example, 180 minutes. Plan to complete the paper in one focused sitting and leave time to review your answers before submission.
Check the question count
The question label shows how many questions the paper contains. Use it with the total time allowance to plan how long to spend reading, writing, and reviewing each response.
Confirm that the paper is active
An Active status means the mock is currently available to take. If a paper is not active, students should check its schedule or contact the course administrator rather than attempting to open it.
Check remaining attempts
The attempt label states whether an exam attempt remains. Because beginning a timed mock may use an available attempt, start only when you have sufficient uninterrupted time and are ready to complete the paper.
Marked by Edge
This label confirms that Nanaska Edge will use AI to evaluate the submitted mock answers. After finishing, review the mark and detailed feedback to understand how effectively the responses addressed the requirements.
Start Exam
Select Start Exam when ready. Read the instructions and every requirement carefully, monitor the remaining time, answer all available questions, and submit through the examination interface.
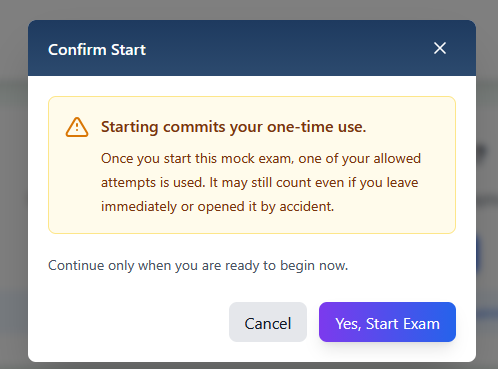
Starting commits the current attempt, so confirm only when ready to begin immediately.
Confirm the exam start
Selecting Start Exam opens a final confirmation dialog. This prevents a student from consuming an attempt through a casual or accidental click and gives one last opportunity to return to the mock-paper list.
Current attempt cannot be restored
Choosing Yes, Start Exam commits the current attempt. It may be counted even if the student exits immediately or opened it accidentally, so there is no return or undo for that individual attempt.
Cancel or begin
Select Cancel or close the dialog if you are not ready. Select Yes, Start Exam only when you can begin immediately and have sufficient uninterrupted time.
Demo retry availability
The demo is configured to allow students to try the mock exam more than once. However, every confirmed start still consumes one available attempt; a retry is possible only while another demo attempt is shown as available.
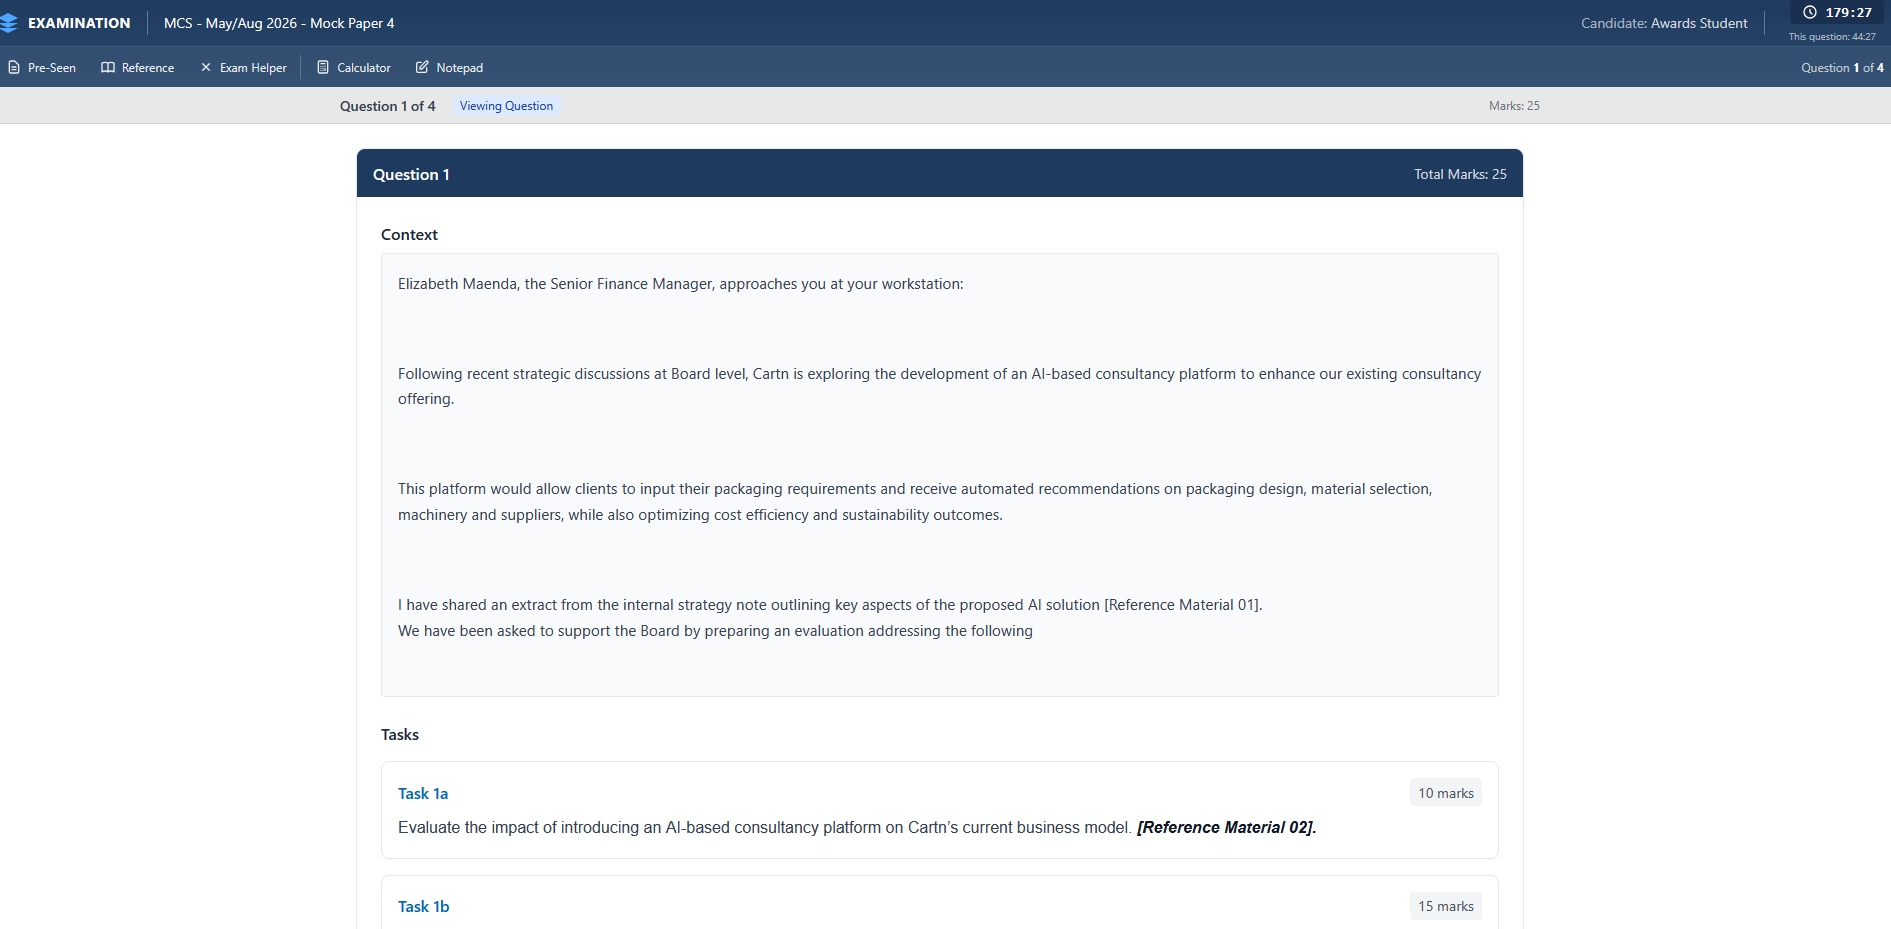
Read the context and task requirements carefully, then enter each response within the timed examination workspace.
Work inside the examination interface
The workspace is intentionally designed to match the layout and working style of the actual CIMA examination interface. The header confirms the mock paper and candidate, while the main workspace presents one question at a time. Read the complete context, review every task, and enter the corresponding response in the answer area provided further down the question page.
Monitor the exam timer
The main timer in the upper-right corner shows the time remaining for the complete examination. A separate “This question” timer helps the student see how long has been spent on the current question.
Navigate the questions
The interface shows the current position, such as Question 1 of 4. Use the examination navigation controls to move between questions, and check that every question has a response before final submission.
Read the question context
The Context section describes the business situation, the people involved, and the decision or problem being addressed. Use these details throughout the answer so the response remains practical and specific to the case.
Answer each task separately
A question may contain multiple tasks, such as Task 1a and Task 1b. Read the command verb and requirement for each part, then enter a clearly separated answer that directly addresses it.
Use the marks to allocate time
The question header shows its total marks, while each task shows its individual allocation—for example, 10 and 15 marks within a 25-mark question. Give higher-value requirements proportionately more time and depth.
Open Pre-Seen and Reference material
Use the Pre-Seen and Reference controls to consult material made available inside the mock. Where a task cites a numbered reference, read that source before constructing the response.
Use the examination tools
The toolbar also provides Exam Helper, Calculator, and Notepad. Use them to interpret the interface, perform calculations, and plan points without losing your place in the paper.
Enter and review responses
Type the answer into the response field associated with each task. Before moving on, check that the entry is saved or retained, uses a clear structure, applies relevant evidence, and responds to every part of the requirement.
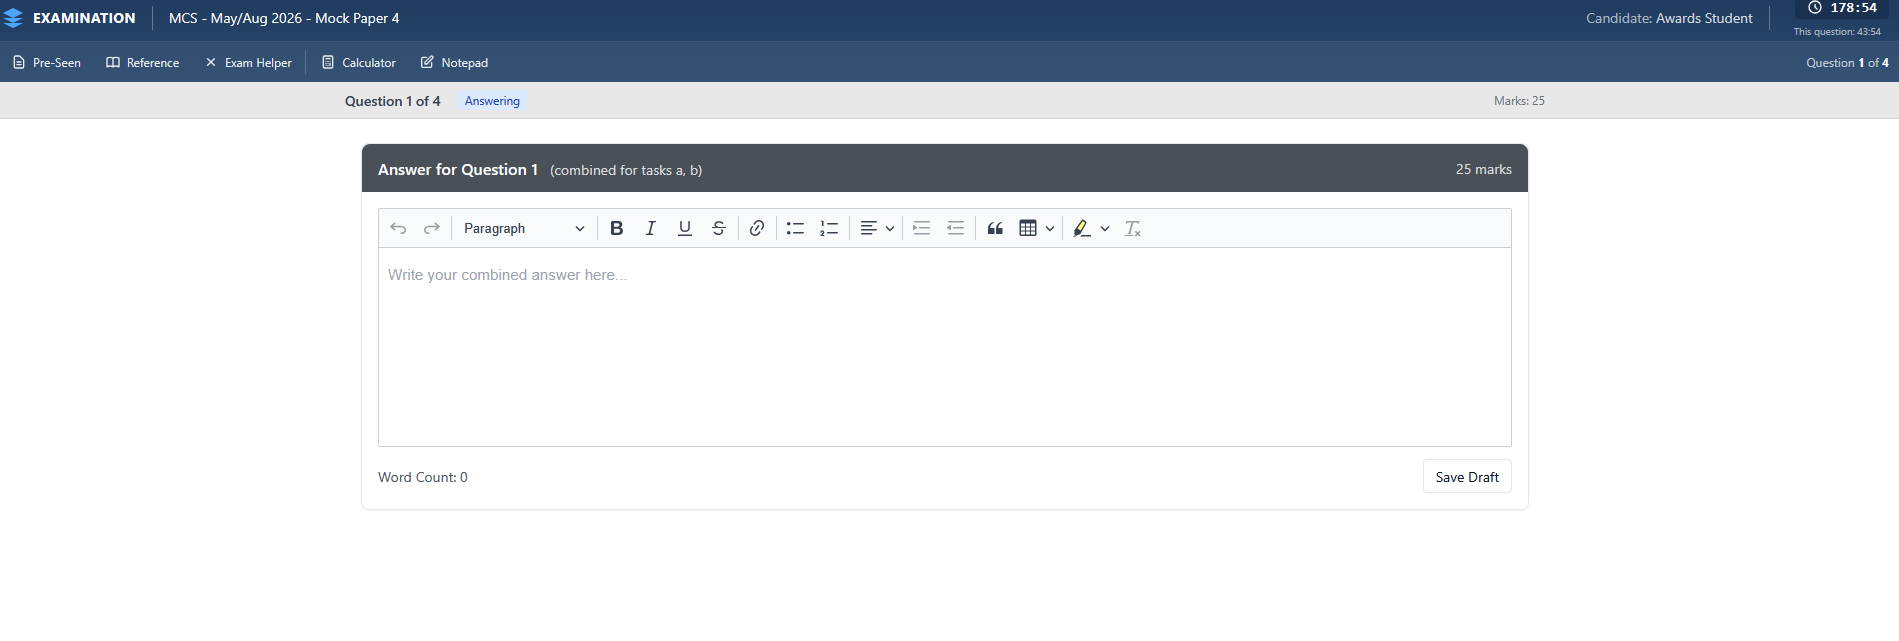
Enter the response in the answer editor, monitor its length, and save a draft before moving away.
Write the combined answer
This is where the student enters the complete answer for the question and tasks displayed on the preceding screen. The heading identifies the question and shows when one response should cover multiple tasks, such as parts a and b. Organise the answer with clearly labelled sections so the marker can see where each requirement has been addressed.
Use the answer editor
Type directly into the large response area. The toolbar supports useful structure such as paragraphs, emphasis, lists, indentation, quotations, tables, and highlighting, but formatting should support the analysis rather than distract from it.
Monitor the word count
The live word count shows the current response length. Use it with the task’s mark allocation and remaining time to judge whether the answer has enough depth without becoming repetitive.
Save Draft
Select Save Draft during the exam and before moving to another question. Continue to verify that the latest changes have been retained; a saved draft is still unfinished until the complete exam is submitted.
Keep watching the timers
The overall and current-question timers remain visible while answering. If the current question is taking too long, save the draft, move on, and return later if the examination interface and remaining time allow.
Copy-and-paste demo answers
Use these prepared responses to demonstrate the complete AI-marking workflow. Each file is a combined answer covering sub-questions a and b for the stated question. Copy the relevant answer, paste it into the matching combined-answer field, save the draft, and submit the mock when ready. These are demonstration data rather than prescribed model answers.
Question 1 — Combined answer for sub-questions a and b
Applies the AI consultancy proposal to defining, creating, delivering, and capturing value.
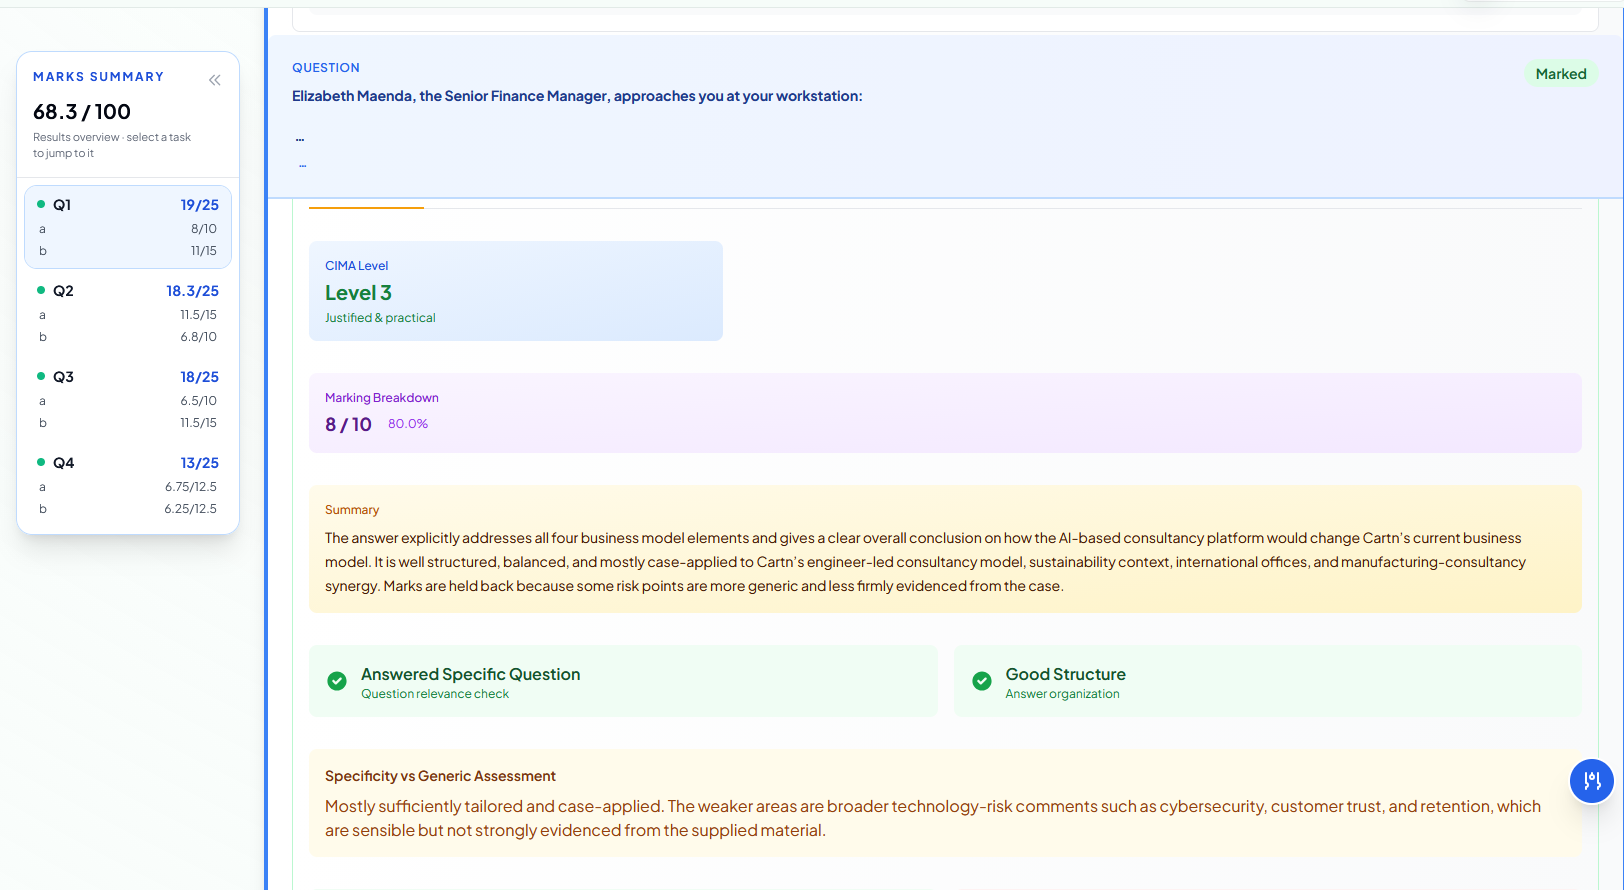
The detailed results page connects every score with feedback that can guide the student’s next study action.
Review the Marks Summary
The panel on the left shows the total mark for the mock and breaks it down by question. Expand or select a question to see the marks awarded to each sub-part and jump directly to its detailed feedback.
Overall result
The headline score summarises performance across the complete paper—for example, 68.3 out of 100. Use it as an overall indicator, then examine individual questions to understand where marks were gained or lost.
Question and sub-part scores
Each question displays the mark achieved against the maximum available. Scores for parts such as a and b reveal whether a particular requirement caused difficulty even when the question’s combined result appears strong.
Marked status
A Marked status confirms that evaluation has been completed and the detailed result is ready to review. Check that status before relying on the displayed feedback as the final result for the attempt.
CIMA competency level
The CIMA Level indicates the standard demonstrated by the response, accompanied by a short description such as Justified & practical. This helps students understand answer quality beyond the numerical score alone.
Marking Breakdown
The breakdown gives the mark and percentage for the selected requirement—for example, 8 out of 10 and 80%. Compare this with its contribution to the full question when prioritising improvements.
Read the feedback summary
The summary explains the main reasons for the mark, including how well the answer addressed the requirement, used the case, balanced its discussion, and reached a useful conclusion.
Recognise demonstrated strengths
Positive feedback cards highlight successful behaviours such as answering the specific question and using a good structure. Preserve these strengths when working on weaker areas rather than rewriting the entire approach.
Improve specificity and case application
Detailed assessment comments distinguish case-supported analysis from generic statements. Where feedback says a point is not strongly evidenced, return to the pre-seen or trusted industry research and identify facts that support, refine, or challenge the claim.